TouchTerrain: A Web App to Easily Make 3D-Printable Terrain
Models
Chris Harding
(Geological and Atmospheric Sciences, Iowa State University) and Franciszek
"Franek" Hasiuk (Kansas Geological Survey,
University of Kansas)
Reformatted
version of a poster exhibited at the AGU conference in December 2020.
Quickstart
1.
Go to touchterrain.org
2. Select the area you want to
print on the Google Map
3. Define the physical
dimensions of the 3D printed model
4. Check the model with the
interactive 3D terrain previewer
5. Download the STL file and 3D
print your terrain model from it.
Background
· Communicating the 3D nature
of terrain is fundamental for many geosciences, yet difficult to archive with
2D contour maps. Using 3D printed terrain models can help to reduce this cognitive burden.
· TouchTerrain (touchterrain.geol.iastate.edu),
launched in 2017 and currently at version 3, allows non- experts to use a
simple web-mapping interface to produce 3D-printable models of the terrain of
any area on Earth, including the ocean floor. Several online elevation data
sets are available (e.g., 10m US DEM, ETOPO 1km grid globally).
· Users can pan/zoom to an
area of interest on a Google Maps-style map, visualize the terrain as a
transparent hillshade overlay and adjust its viewing parameters
(transparency, sun direction, sun angle, and
gamma). Numerous 3D print options are provided to
support the user’s specific 3D printer model, including the physical 3D model
size, whether to tile the model into sub-tiles, its base thickness and its
vertical exaggeration.
· For verification, an
in-browser 3D visualization is shown prior to
downloading the generated 3D model. Expert settings include setting a specific
geographic projection and ignoring areas below
sea-level.
· TouchTerrain can also
be run as a standalone Python program (and within a jupyter
notebook) on a local computer where, in addition to the online DEM sources,
local geo-tiff DEM files (e.g. LiDAR terrain) can be processed.
· TouchTerrain is a collaborative open
source project, for details see github.com/ChHarding/TouchTerrain_for_CAGEO/.
Why use 3D
printed terrain models ?
· Most terrain models printed
on today's consumer-grade 3D printers are between 10 cm and 40 cm square. From handling and examining
everyday hand-held objects, everybody is already familiar with how to
"navigate" (zoom, rotate and pan) the 3D terrain model and visually
explore it from different angles. This ease-of-use compares favorably to the often cumbersome interaction with digital 3D graphics models
via computer.
· In addition, physical
terrain models offer a tactile experience; most people, when given such a
model, instinctively run their fingers over it. This
multi-sensory combination affords users a richer and more natural exploration
of the elevation data represented by the 3D printed terrain model.
· An added benefit of 3D
printed terrain models is a "frontloading" of all technical aspects:
although the creation of the digital 3D model does require technical expertise
in GIS, etc.; and the 3D printing process requires
the know-how and equipment to operate the 3D printer,
interaction with the resulting physical object is simplicity itself and
requires no technology at all.
· The core ambition of the TouchTerrain project is to minimize the technical GIS
expertise when creating the digital 3D models that are later
given to the 3D printer. With TouchTerrain, no
GIS expertise is required, simply select the desired area and download its 3D
terrain as a STL/OBJ file.
· 3D printed models are now
cheap to print and sturdy enough for use on field trips; e.g., to situate
students within the surrounding terrain. They can be sprayed
with primer and sketched on in the field.
· In the classroom, 3D printed
terrain models can be used in conjunction with paper contour maps of the same area to help students better
understand the fundamental principles of contour maps.
· Finally, as tangible,
physical objects 3D printed terrain models can provide an emotional attachment
to a place or area that digital
formats lack. Many TouchTerrain users report printing
the area they live in,
go hiking, travel to on vacations or lived in
as a child.
The 3D printing
process
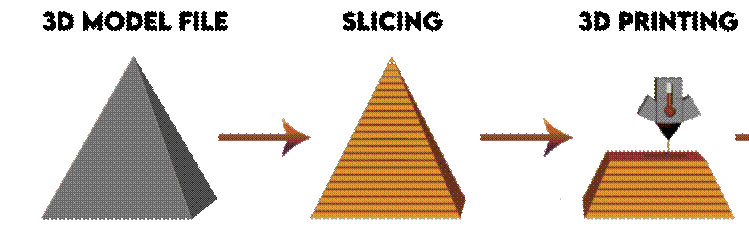
·
Starts with a triangle based 3D CAD model file
(STL)
·
The slicer software creates horizontal profiles
(slices) through the model at ~0.3 mm intervals, from bottom to top.
·
Slices consist of many 2-D tool
path lines
·
Each slice uses walls to define the outside and
an infill pattern for the inside of the model
·
The 3D print hardware moves a ~210°C hot nozzle
(typically 0.4 mm diameter) in the horizontal (x/y) plane according to the tool
path lines of each slice
·
After each slice, the nozzle is moved up 0.3 mm
and processes the next slice
·
In FDM (fused deposition modeling) 3D
printing this nozzle extrudes hot plastic filament, which cools to form a
solid layer. Each layer is extruded on top of the
previous layer and fuses with it, thus slowly creating a physical object.
·
Animation
of the process
·
Timelapse of 3D printing with a delta printer (uses Octolapse)
·
YouTuber creates a continent
scale terrain model of the US using TouchTerrain
TouchTerrain Web App
walkthrough
Defining
the area to print
· Option 1: Manually navigate
the Google map to the area, click Re-center box on map and adjust the red box manually (video)

· Option 2: Use the Place search
bar on the top to fly to the place,
click Re-center box on map and
adjust the red box manually (video)

· Option 3: Click on Area Selection Box and manually enter
the four lat/long coordinates of the box corners, hit the Enter key after each entry. (video)
· Option 4: Upload a kml file containing a polygon of the area. (May need to
click on Area Selection Box first) (video)

· Ensure that the area is covered by the grey, semitransparent overlay (hillshade). If not, select the AW3D30 DEM under Elevation
Source (video)
Setting 3D Printer Options
· After
defining the red area selection box, set the desired width of the 3D printed
model. The height will be set automatically. Ensure that the build plate of the
3D printer is large enough for these dimensions. (video)
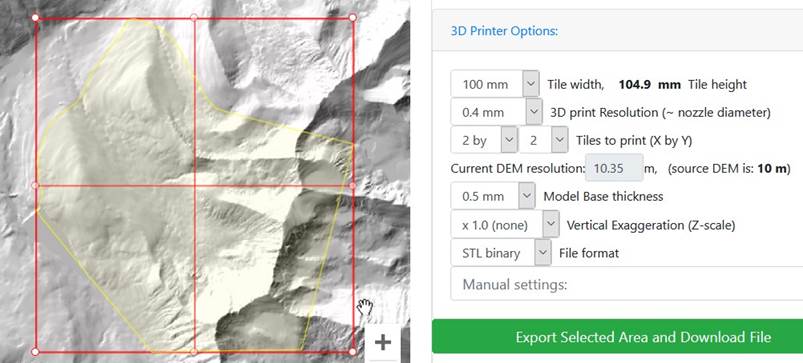
·
Set the value
of 3D printer
resolution to the diameter of you printer's nozzle, typically 0.4 mm. Using a lower value does not increase
your print's detail
and will only result in larger STL files. (video).
Setting a
smaller layer height (e.g. 0.2 or 0.15 mm) in the slicer settings will get you
better detail but will take longer to print
·
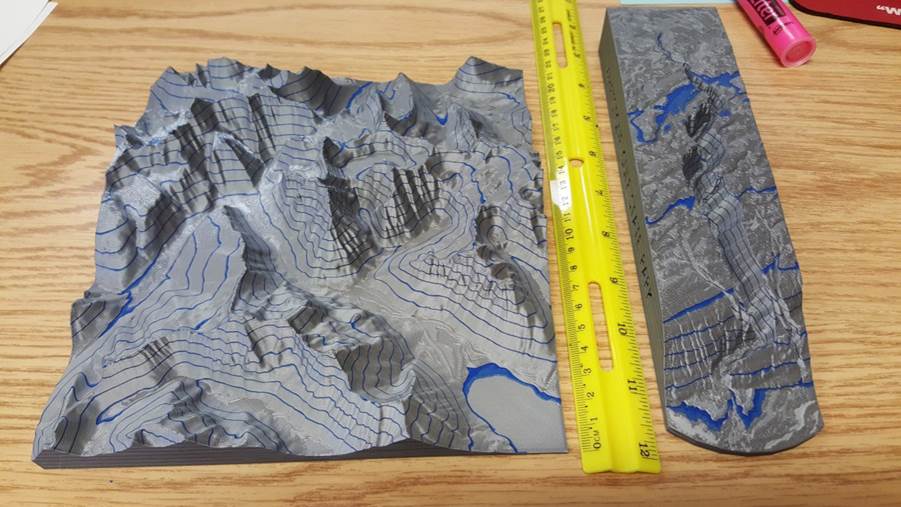
Decide if you want to divide your area into multiple
tiles. Each tile has the width/height and print resolution set
earlier. The dimensions of the 3D printed tiles will fit together perfectly and
can be glued together to a form a single, larger
model. (video)
·
Select the Model Base thickness. This defines how high a base will printed before the actual elevation
model starts. 0.5 mm is typically enough to ensure that the very lowest parts
of your model (e.g. a river) do not end up with too few layers when printed and
may become "see-through (video)
· Set the vertical exaggeration (z-scale). This will
multiply the terrain elevation by this factor, e.g., a z-scale of 2 would double the elevation and give you much
"steeper" terrain. Using a zscale > 1 is
recommended when printing low-relief terrain in order to have at least 50
layers to print with (video, with comparison
example)
· For File Format, STL binary (smaller filesize than STL ascii
or OBJ) is an extremely common triangle model format for 3D printers. OBJ
format is sometimes preferred for working with 3D modeling software.
· There are more options you
can enter into the manual options field and are described
here under Processing Parameters. This video shows two manual options
that can help to print better shorelines.

Previewing
and downloading the model
· With all options now set hit
the green Export button to create your model file. Marvel at the animation while your model is processed.
·
Once processing is done you'll be able to preview your STL (video). If you're
happy with the model click Download zip file.
· The zipfile
will contain a STL file (multiple files for multi-tile models), a detailed log
listing all options used and processing steps taken and a GeoTIFF
of the terrain suitable for import into a GIS
program.
· Finally, you will be shown the URL for this model with all settings it
used. This can be handy if you want to "bookmark" your print or email
it to others.
TouchTerrain stand-alone version (advanced)
·
TouchTerrain can also be run as a Python-based,
stand-alone program
· The DEM raster to STL
processing workflow can be run via a python (.py) file or via a jupyter notebook (recommended!).
· All TouchTerrain
code is freely available via this GitHub repo
· The standalone version can
process terrain from a local GeoTIFF file. GeoTIFFs are a popular file format for elevation data. A
GIS can be used to generate new GeoTIFF terrain files
(e.g., from Lidar data) or to post- process a GeoTIFF
downloaded via TouchTerrain.
· After signing up for a Earth Engine license at Google (free), it is also possible
for the stand-alone version to access the same DEM sources as the web app version.
· The print area and all print
options are specified via python variable settings:
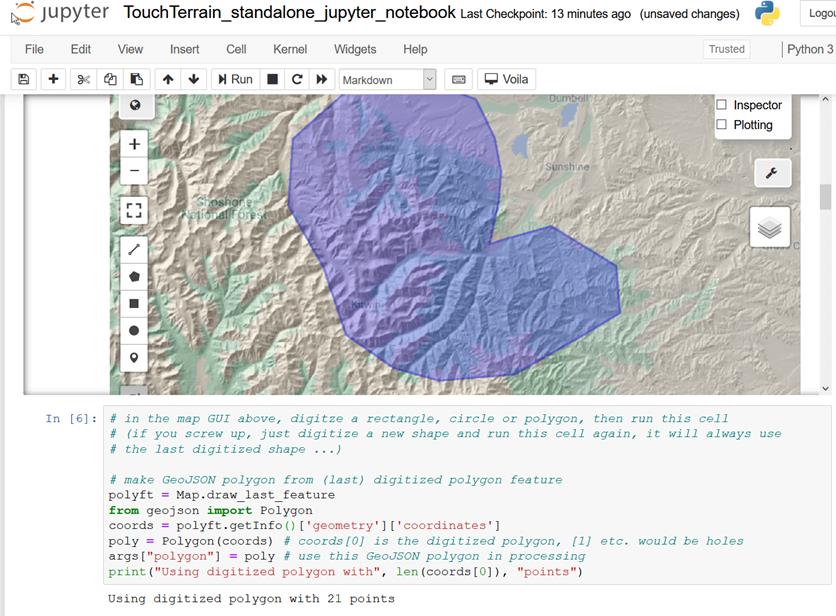
·
The print area can also be defined interactively by digitizing a box,
polygon or circle:
· Processing creates a local
STL file that can be previewed inside the browser:
· A html render of the entire jupyter notebook is here
·
A video demo of using the standalone jupyter
version is here
Gallery of 3D terrain prints
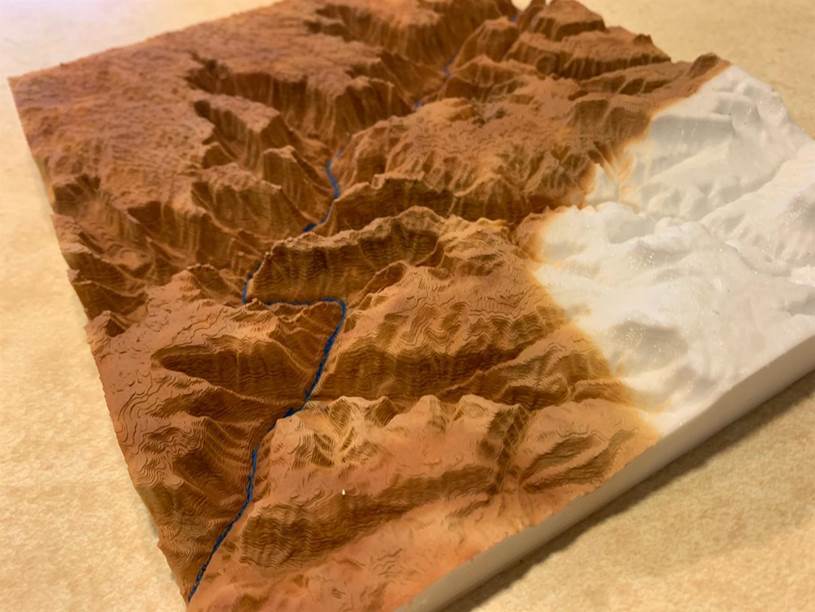
(Grand
Canyon, hand colored by geological formations)
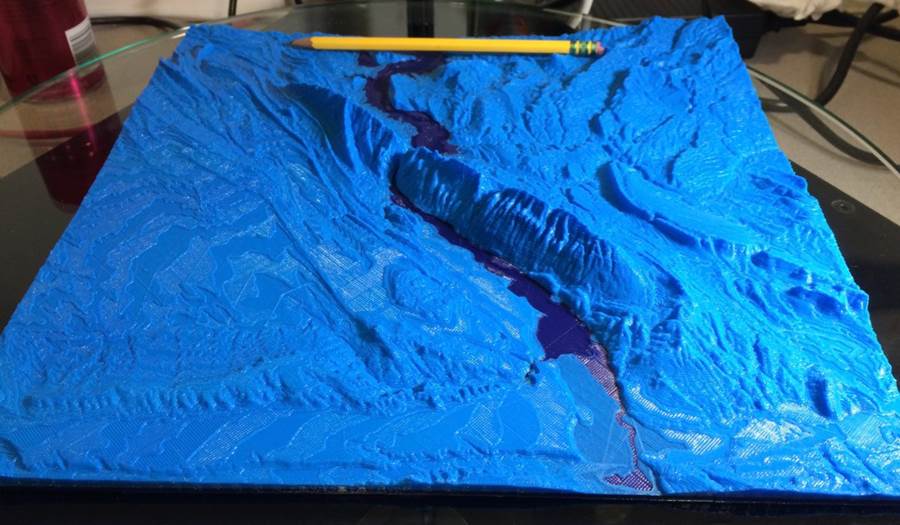
(Sheep Mountain near the ISU Summer Fieldcamp in Shell, WY. Color change that highlights the
river morphology was accidental.)
(Print by
Ed deSantis with partial coloring)
(View along
the Hong Kong coast. Print by John Steele
)
(Tiled and
colored terrain print of a triathlon race, by Ed deSantis)
(Two color
print by Rob Lawry. Effect is created by stopping and
changing the filament at regulat layer intervals)
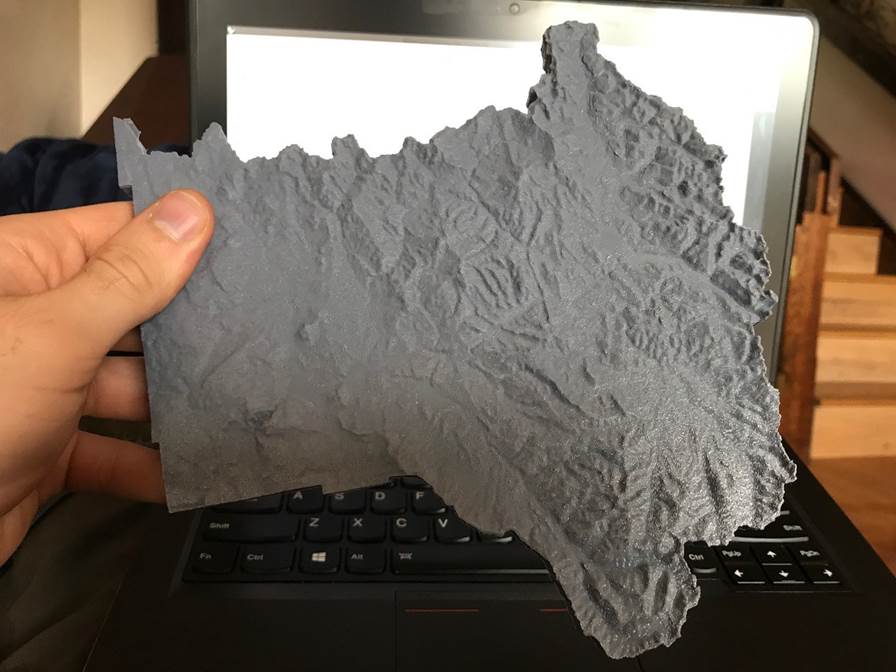
(Terrain
print with polygon outline by Bryson Hicks)
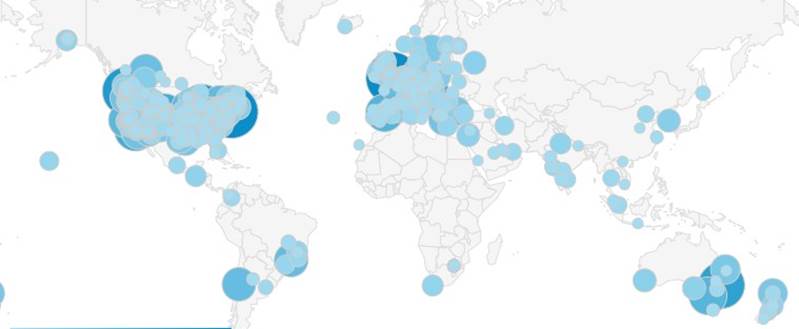
Web Usage numbers
Usage numbers are derived from Google Analytics of the web traffic for the
TouchTerrain Web app. The following information
pertains to site usage from October 2019 to December:
o
Roughly 100 different
users visit the site every day, with a noticeable increase since version
3 in early October 2020:

o
Roughly 100 downloads
per day:
o
Site usage is worldwide:
o
48% of users are from the US, most from major cities:
Usage type (from
the optional feedback: "tell us what you're using this model for"):
o
9.33% of users leave some form of feedback
o
Feedback indicates that TouchTerrain is used in education, for outdoor trips
and for creating
models of familiar areas.
Here are some
examples of the feedback received:
o
For my wife's Earth science 11 class.
o
3D print for use in a hands-on, 4th grade science unit
about flood and drought, looking at a local
watershed.
o
Tangible maps for daughters kindergarden
class can use
o
Elementary School education
o
For my Grandson School Project
o
I want to make a science project about
volcanoes
o
4th grade landform project
o
Middle school 3D printing class example. Students will each export and
print their own terrain.
o
Teaching oceanography course: section on coastal geology
o
Glacial Flow modeling
o
Teaching geomorphology
o
Geological reference
o
Research in geographical data types and elastic displays
o
For a museum to illustrate how increased tides will effect
the waterfront area in Kingston, NY
o
Meteorology training
o
Paragliding training
o
Planning ski routes
o
To help understand radio coverage in the area
o
To map sacred sites in Kenya
o
Examining topography in North American Monsoon region
o
Secondary Earth Science instruction
o
College physical geology class
o
History class, I am a teacher
o
A fab lab class activity
o
3d printing maps for exploring the White River for visually impaired
folks in northwest arkansas
o
I print ski resorts so you can see the mountain from a new perspective!
Teaching my kids their surrounds, way to svhool, beach, woods we visit
o
For my dads distract so ist
can help him describe wehre fires are located in his distract
o
Just wanted to print the local area on my 3d printer
o
I am first year architecture student, Struggling with site model. We were asked to trace old map
isocurves and then lift them at elevation
o
3rd year industrial design project
o
3d printer to create a topographic map of our campus.
o
Snowmobile zone mapping
o
Lifeguard training
o
Flight training
o
Ham radio club
o
Looking to land to build retirement
home
o
To better understand my property.
o
Elevation comparison in my town
o
3D printing Kauai island since we can't travel there currently
o
Just a personal print to map hikes we do in the Tetons.
o
Mountain bike trail map
o
Trailrunning
o
For making a jigsaw puzzle.
o
A gift for Grandma
o
To match with drone footage
o
Make into a trophy for beer Olympics
Places searched:
TouchTerrain Version 3 added a place search field. These
are the top 25 searches since October 15, 2020

Some tips for 3D printing terrain
·
This assumes that you are already familiar with
3D printing in general and know how to change settings in your slicer
·
Lay your terrain model flat on the buildplate, that way the layering will look like contours
·
A layerheight of 0.2
to 0.3 is typically good enough
·
However, make sure that you have at least 50 layers, otherwise your print will lack detail. Either
use vertical exaggeration or scale it later in the slicer to about 50 x layerheight (e.g.: 50 * 0.3 mm => your model should be
15 mm tall)
·
10% infill it typically enough, but make sure
you have at least 3 top layers
·
Use a 7 - 12 mm brim, a heated bed or even
an enclosure (hood) to avoid curling on the corners and edges
·
Instead of the typical line type
use a concentric fill pattern for
your top (skin) layers. This will avoid artificial looking stripe
patterns, which are especially obvious on flat terrain or lakes
·
Set combing to only
within infill to avoid ooze tracks
·
PLA and PETG are perfectly suitable to terrain
models, but ABS may warp without an enclosure
·
Printing terrain generally requires very little part-cooling which also promotes layer adhesion.
However, good part cooling should be set for very short layer times (e.g., for
small peaks) to prevent stringing
·
For post processing, brushing the top with a
wire brush is usually enough to remove any stringing. A hot air gun is more
effective but can easily warp your model when used for too long!
·
3D Prints are typically somewhat glossy. If you
prefer a matte finish or want to be able to paint
or draw on your model, spray the model with gray automotive primer filler.
After this you can use a soft pencil or
Sharpie to draw on them and use a dry eraser or rubbing alcohol to remove
drawings. Do NOT use nail polish remover (acetone) as this will deform the
surface!
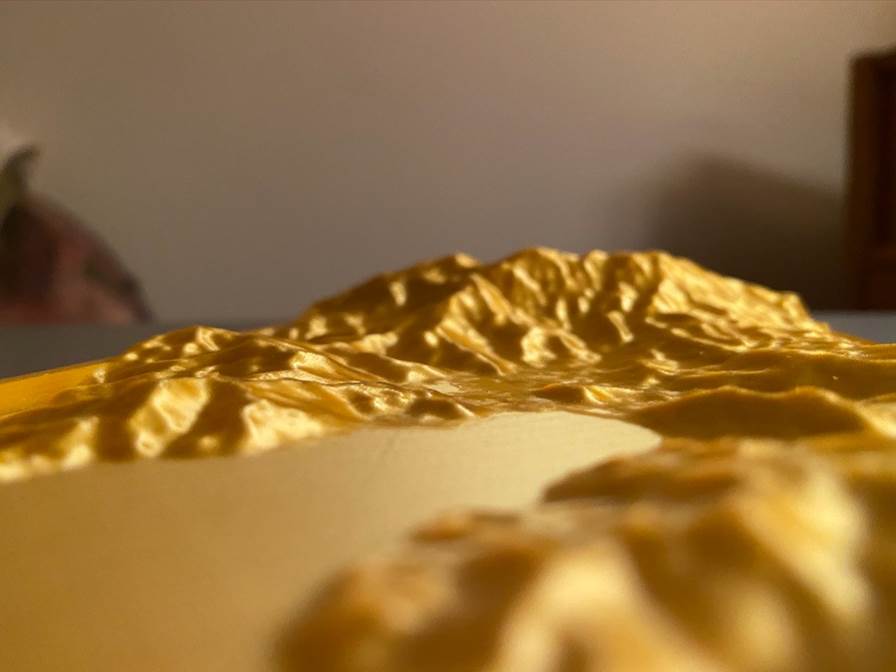
·
Gray filament seems a good compromise to still
bring out details in dim lighting conditions (e.g., classrooms) but metallic
looking filament can produce very artistic results
·
Use superglue gel(!)
for gluing together multiple terrain tiles. To mount the
terrain on a wooden plate, use a hot glue gun, which later can be removed with alcohol.
(last edit Jan. 8, 2020)